


This page will familiarise with the basics of the creation of cardboard furniture. The method described here uses intertwined crosspieces and is called the ‘crosspieces method’.
This introductory course is for beginners in the world of cardboard work, even for beginners of DIY in general. Don’t worry go for it!
In this tutorial you are shown how to create a little chest of drawers which is quite basic in ‘cardboarding’.
The method has three chronological parts:
Step A: The front, the middle, its crosspieces and the back
Step B: The niches, the drawers and the sides
Step C: The decoration -the choices you have
Draw the piece of furniture on graph paper at the wanted scale.
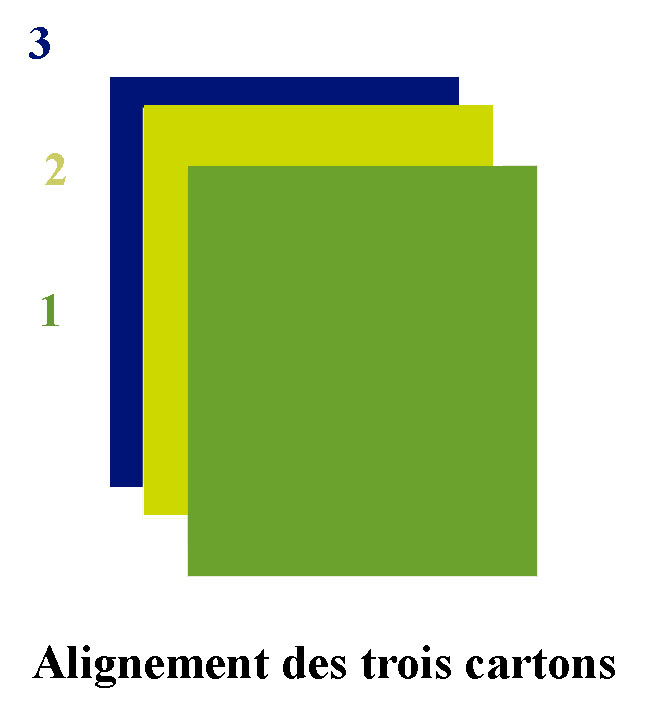
Take three pieces of cardboard with vertical corrugations:
Draw the outline of the piece of furniture on the cardboard with chalk. The chalk allows you to alter the drawing a lot of time by erasing the lines without ruining the cardboard.
If you have a jigsaw, assemble the three pieces of cardboard with gummed tape and cut the outline of the three pieces at the same time. If not, cut the pieces one by one with a craft knife.
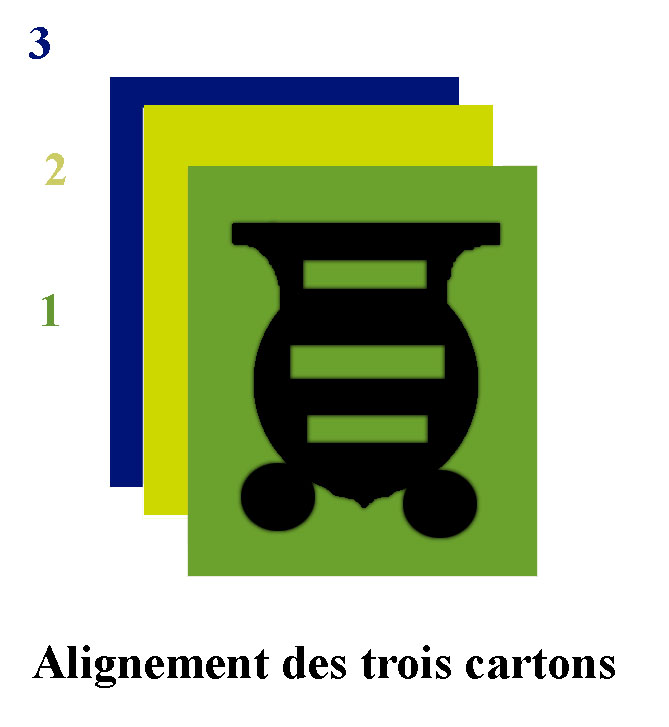
You need to cut ‘holes’ with a craft knife in the front (1) and the middle (2) uprights. They will be used for the niches and the drawers.
Beware! Don’t cut holes in the back (3) unless you want a hole in the back!

Once the three uprights done, number them so as not to lose the position and keep the pieces cut for the drawers, as they will be used later for the drawer fronts.
You have to make some notches in the middle upright (see the schema for the notches). The notches must be the length of half the size of the cut parts of the upright. For instance the top of the chest of drawers below is 12 cm tall you have to make a notch at 6 cm. This notch must be as thick as the cardboard (3mm) as the crosspieces have to fit into the notches. The whole thing will make the skeleton of the piece of furniture and will give its strength. The more notches there are the stronger the piece of furniture will be. No need to have notches everywhere though, the aim is to have them in the right strategic places that you will find with experience.
Do not forget to have notches and crosspieces in the vertical part of the piece of furniture! There are none on my scheme: I know this is a little mistake!
The length of the crosspieces determines the depth of the furniture. The longer the crosspieces are the deeper the furniture will be.
All the crosspieces must have the same length and be notched in their middle. However most of them will probably be of different heights according to their place in the skeleton.


A tip for not getting confused is to number each notch and its corresponding crosspiece with a pen.
Apply some hot glue with the glue gun on the notches and insert the crosspieces into the notches of the middle upright.
Lay down the back upright (3) on the floor or on a table and put the middle upright on it with its crosspieces. Then put the front upright on the middle upright. They must be perfectly aligned at right angles. To do so hold a hardcover book open and vertical. Or take anything that can help you have a right angle and get the uprights aligned.
Place a dictionary on the front upright or something heavy (not too heavy though!) to maintain pressure. Now you can start a more tedious work: glue each crosspiece on the back upright (3) and then on the front upright (1). To do so there are two possibilities: cut a lot of pieces of gummed tape in advance and wet them little by little. Otherwise you can glue everything with the glue gun: the work is shorter and the result will be more resistant.
Once this is done you can stand your piece of furniture up. Put it alongside a wall and verify that it is straight. If you notice that it leans forward or backward, it is now or never to ‘cheat’ by sanding the foot of the back upright if the furniture leans forward or the foot of the front upright of its leans backward.
Whether you create drawers or simple ‘holes’ you have to make the inside of the niche. To do so you need to measure each part of the hole and create the bottom, the sides and the top of the niche. Note that the pieces of cardboard will have to be adjusted with the craft knife or sand paper. The reason is that the thickness of the cardboard biases the original measurements. As a matter of fact if you start with the bottom and the top of the niche (both of them being 0.4 mm thick) the height of the sides will be reduced (by 0.8 mm in our example).
Beware! It is better for the pieces of cardboard to be too long on the front than being too short as if too short you will have a gap which is hard to hide. On the other hand if the piece is too long you still can adjust and sand for a perfect result.
 The
bottom of the niche: Measure the width and the
depth of the bottom of the niche. Use a metal ruler (or a ruler which begins at
0 exactly) and push it in up to the back upright (3). For the width take the
exact measurements, for the depth it does not matter if too long as you can cut
it with the craft knife or sand it. Glue the crosspieces and position the
bottom.
The
bottom of the niche: Measure the width and the
depth of the bottom of the niche. Use a metal ruler (or a ruler which begins at
0 exactly) and push it in up to the back upright (3). For the width take the
exact measurements, for the depth it does not matter if too long as you can cut
it with the craft knife or sand it. Glue the crosspieces and position the
bottom.
The sides of the niche: Measure the height of the sides of the niche. The depth should be the same as for the bottom of the niche. Position the cut pieces and draw the edges of the crosspieces on them by inserting a pen by the side of the furniture not closed yet. This technique allows you to apply the glue at the exact place where the crosspieces are. Apply some gummed tape on all the length between the bottom and the sides to keep them together.
The top of the niche: Turn the piece of furniture upside down to create the top and proceed the same way: measure, cut, verify, glue, adjust and apply some gummed tape along all edges (see the scheme below that explain the two ways of covering properly and cleanly the angles.)
In any case if one of these three pieces of cardboard is a little too big at the front, pass the blade of the craft knife along the cardboard join with the front of the piece of furniture. Sand gently the edges. When everything is smooth, apply a strip of gummed tape on the edge.
To get a clean application of the gummed tape:
This application is important because
it determines the cleanness of the finishing. A gummed tape badly applied is
hard to hide later on.
The drawers
are made something like the niches. But don’t take the same measurements as for
the niches! The different part of the niche (bottom, sides, top) will reduce the
hole (for instance if the cardboard is 0.4 mm
thick the niche will measure 0.8 mm
less at the end, which is nearly 1 centimetre). Therefore to create your drawers
you have to measure each niche again one by one: depth, width and height. Create
the bottom, the sides and the back. Create all the part of the drawers except
the front. Put the drawers without its front in the corresponding niche and
adjust the possible overlap by passing the blade of the craft knife along the
cardboard at the meeting point with the front of the piece of furniture.

For the front of the drawers you will use the pieces of cardboard cut during the creation of the uprights. You normally have two ‘fronts’ of drawers for each drawer: one piece cut in the front upright (1) and one piece cut in the middle upright (2). For each drawer, glue these two pieces together for more thickness, correct the possible uneven areas (craft knife and sand paper) and cover all the edges with gummed tape (see the schema opposite).
A tip to have clean angles and edges: apply the gummed tape along the length of the front. Just after and when still damp rub the edge against a flat surface. The aim is to have a flat application of the gummed tape with nice angles that does not crease or crumple anywhere.
Note that you can cut new pieces of cardboard for the front of the drawers with a fun shape different than rectangular: round or pointed shaped sides, etc.
Then glue the base of the drawer to its front. Finally apply strips of gummed tape on all the edges, in the interior as well as in the exteriors. Do the same for all the drawers of your piece of furniture.
It is time to make the sides of the piece of furniture.
First you need to measure the edges of the front with a measuring tape. You need to start from the top, go all around and finish at the opposite side of the top. Normally the more the side is intricate the longer the piece of cardboard you will need… You still can have one or two joins under the piece of furniture or in a hollow.
 You
need to cut a piece of cardboard with horizontal corrugations with the right
dimensions. Its width needs to have the same
measurement as the depth of the piece of furniture. Use the measurement
previously taken for its length.
(See the scheme opposite, the pink part represent the
place where the cardboard needs to be added and the horizontal lines shows the
direction of the corrugations).
You
need to cut a piece of cardboard with horizontal corrugations with the right
dimensions. Its width needs to have the same
measurement as the depth of the piece of furniture. Use the measurement
previously taken for its length.
(See the scheme opposite, the pink part represent the
place where the cardboard needs to be added and the horizontal lines shows the
direction of the corrugations).
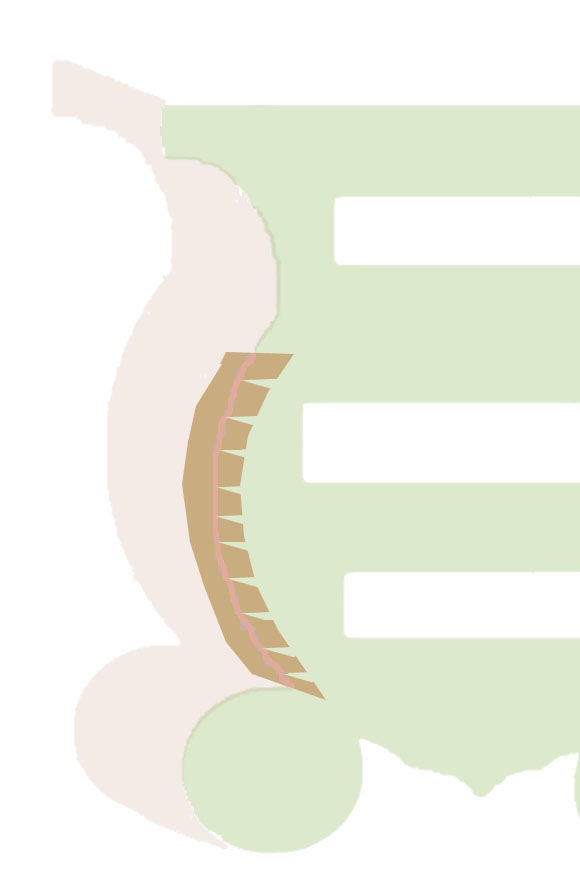
Work the cardboard by rolling it around a tube in order to prepare the corrugations to fold. With the glue gun, apply some glue on the horizontal crosspieces and on the middle upright. Do it little by little because it dries very quickly. You need to unroll the cardboard gradually from the top to the bottom of the piece of furniture. Do the same on the other side and close at the bottom with gummed tape. Then adjust any overlaps at the front or the back with sand paper or the craft knife. Then apply a strip of gummed tape along the whole length by making notches in the curved part (see the scheme on the right). Then smooth down the little rectangles one by one on the front and the back upright.
The Top Piece
Measure the top of the piece of furniture and cut two similar pieces of cardboard with an overlap to form the edge (one centimetre for example): join them as for the front of the drawers to get more thickness. Otherwise for more resistance you can do as with plywood: when glued together the two pieces must have perpendicular corrugations.
Some people put a thin piece of wood under the piece of cardboard so that the top of the furniture is more resistant. As far as I am concerned I prefer the ‘all cardboard’, which is more fun!


● Now you need to check your piece of furniture very carefully in order to make any necessary adjustments. Don’t be afraid to add pieces of gummed tape at the corners or on the edges of the holes.
● You have several choices for the decoration:
Note that with untinted tissue paper and primer you will need to paint your piece of furniture. In all cases you will need to apply a final layer of varnish.
 Tissue
paper helps to hide the evidence
of the gummed tape and corrugations of the cardboard. It must be applied over
the
Tissue
paper helps to hide the evidence
of the gummed tape and corrugations of the cardboard. It must be applied over
the whole surface of your piece of furniture when this one is dry.
To do so, tear up a great quantity of tissue paper in pieces, big ones as well as little ones. The more random the shape is the better. Coat with glue a part of the piece of furniture, stick a piece of torn tissue paper and smooth with a brush with creases. Be careful the paper is very thin and is made more fragile with humidity. You’re better off starting with a hidden part of the piece of furniture for practice!
The pieces of tissue paper must overlap (see scheme opposite). Some pieces must be glued at the edge of a face, and go over the edge so the whole surface is covered. The cardboard must not be visible at the end.
Cover the entire piece of furniture including the drawers this way and wait for the paper to dry. The cardboard is going to bend slightly, but don’t be worried as it will take its original shape when dried.
With tissue paper more than one layer is sometimes necessary. With other kinds of thicker paper like tracing paper, one layer is usually enough.
Primer
The primer hides unevenness and avoids
the use of tissue paper. Indeed it hides the thickness of the gummed tape when
two coats are applied at least. Moreover primer gives an additional protection for piece of furniture
meant for a humid place.
least. Moreover primer gives an additional protection for piece of furniture
meant for a humid place.
Important: before spreading the basecoat apply first a layer of wood glue mixed with the same proportion of water.
You can create your own cheap beasecoat by mixing 9 parts of ‘blanc de Meudon’, 6 parts of wood glue and 3 parts of water. When the mixture is well mixed add a tea spoonful of linseed oil. ‘Blanc de Meudon’ is made of crushed chalk (it is not plaster of paris ...)
You can create relief effects by sticking pieces of string or cardboard (flowers, leaves, spirals, etc). All these additions must be covered with tissue paper or gummed tape to be harmoniously integrated to the piece of furniture.
Handmade
Paper
Handmade paper gives a very nice result but increases the price of the piece of furniture. It is normally thicker than tissue paper but is applied the same way. Apply a layer of wallpaper glue first and then the handmade paper with a brush preferably from the middle to the edges drawing a kind of star. This way the paper will be well flat and will not form creases.
The paper must
go over the edges so the whole surface,
angles and edges are covered. If you want to have delimitation between papers of
different colours like on the opposite photo you need to wait for the paper to
dry before cutting it with scissors or a craft knife: the glue will stiffen it.
The quality of the cut will play on the final result. To do so apply the paper
of the first colour by getting it go over the edges and sticking it on the other
face. When well dried apply the paper
of the second colour and let it overlap. When the second paper is dry cut it
cleanly.
When well dried apply the paper
of the second colour and let it overlap. When the second paper is dry cut it
cleanly.
Painting
For painting over tissue paper or primer you need to use acrylic water-based paints. Apply the paint with little brushes, which is easier. Apply two coats, the second one when the first one is dry (see drying time on instructions). You can paint a sample of cardboard that you use to choose the handles for the drawers.
Varnish
A piece of cardboard furniture must always be totally varnished with an uncoloured water based varnish. The holes for the drawers only need one coat of varnish while the top of the commode will need more than one. Indeed the top is more exposed -it collects dust, glasses and cups are put down on it, etc- it needs to be more protected.
If you intend to put the piece of furniture in a humid place such as a bathroom, you can use a marine varnish usually used for the hull during the careening.
What about the handles?
You can definitely buy handles or you
can make them yourselves.

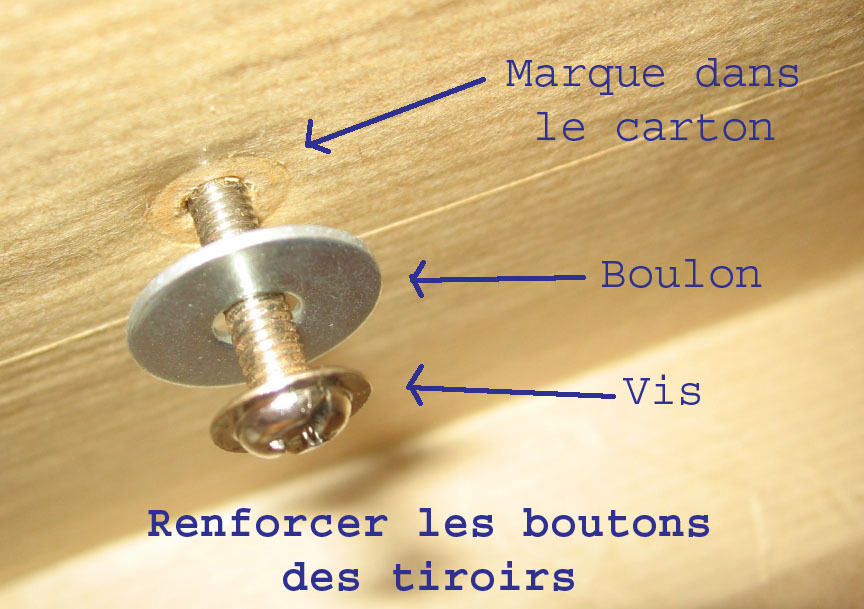
1. You can buy the handles in untreated wood and paint them with the same paint as used for the piece of furniture. You can also buy some fantasy ones. For more resistance it’s better to use washers. They avoid the screw ruins the cardboard after too many uses. See on the photo below the print of the screw in the cardboard. The washer will avoid this.


2. You can create the handles in cardboard. To do so, I have thought about several methods.
The first method:
Cut a triangle in a one-range
corrugation cardboard. The larger the basis of the triangle the larger the
diameter will be. Also the higher the triangle the higher the handle will be.
Roll the triangle starting with the higher part in order to ‘work’ the cardboard. Unroll and apply wood glue on all the surface of the triangle. Roll again, tighten well and maintain the handle with an elastic. Put the handle on a flat surface so that the bottom is very flat. Put a little bit of glue with the gun on the bottom and stick it on the drawer.
The second method:
Cut the shape of the handle you want in a double-range corrugation cardboard. This shape must be cut as seen from above. Make sure that the shape allows your hand to grip it!
Depending on the thickness of the cardboard, cut the shape twice or three times. Then glue one on the other with wood glue. Adjust with sand paper and apply some gummed tape. Use the glue gun to stick the handle on the drawer.

The third method:
You are free to create the handle you want! Elsa (http://elsaisdreaming.free.fr/) has sent to me a photo of the handles of a desk she did. Here is what she says:
‘The handles are made of four little pieces of cardboard stuck together with hot glue. Each layer’s corrugation must be at right angles to the next. I insert a threaded bolt before the last layer (I make a hole to insert it and glue it). Then I sculpt the shape and screw a nut on the other side’.
Thanks Elsa and don’t stop marveling us!